Printing Form 1099 in QuickBooks can sometimes feel overwhelming, especially if you’re new to the QuickBooks Desktop environment. Whether it’s preparing for tax season or ensuring accurate vendor reporting, the process must be precise. In this guide, we will walk you through how to print Form 1099 in QuickBooks on your desktop step by step while avoiding common errors.
Why Printing 1099s in QuickBooks Desktop is Important
Correctly generating 1099 forms ensures your business stays IRS compliant and avoids potential fines. QuickBooks Desktop simplifies this process by automating vendor tracking, calculating payments, and creating 1099 forms ready to file. Using the print Form 1099 in QuickBooks process, you can streamline tax season and maintain clean financial records.
Step-by-Step Guide to Print Form 1099 in QuickBooks Desktop
Follow these steps carefully to print Form 1099 in QuickBooks Desktop without errors:
1. Verify Vendor Information
Before printing, make sure all your vendor information is accurate:
Ensure vendors are marked for 1099.
Check that their Tax ID or Social Security Number is entered correctly.
Review payment thresholds to confirm eligibility for 1099.
2. Backup Your Company File
Mistakes can happen. Always backup your QuickBooks Desktop company file before printing:
Go to File > Back Up Company > Create Local Backup.
Store it in a safe location in case you need to revert changes.
3. Update QuickBooks Desktop
Ensure your QuickBooks Desktop is updated to the latest release:
Navigate to Help > Update QuickBooks Desktop.
Download and install updates if available.
4. Download 1099 Forms
QuickBooks Desktop requires official 1099 forms for printing:
Access Vendors > Print/E-file 1099s > Download Forms.
Make sure you use the correct form version compatible with the IRS year.
5. Prepare Your 1099 Forms
Follow the print Form 1099 in QuickBooks process:
Go to Vendors > Print/E-file 1099s > 1099 Wizard.
Select the correct year and company file.
Map accounts to the correct 1099 boxes.
Review the payment summary and verify totals.
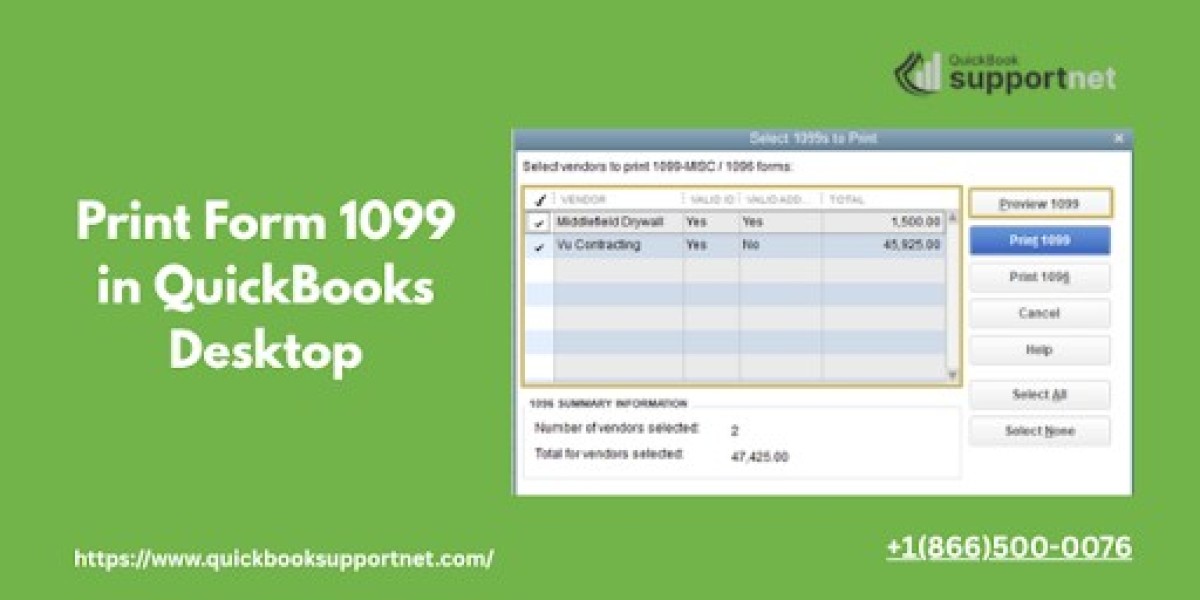
6. Print 1099 Forms
After preparation:
Go to File > Print Forms > 1099s.
Use pre-printed 1099 forms or blank paper depending on your preference.
Perform a test print on plain paper to ensure alignment.
7. File 1099 Forms
Once printed:
Mail the forms to your vendors.
File the IRS copy electronically or by mail.
Common Errors While Printing 1099s and How to Fix Them
Incorrect Vendor Tax ID – Verify SSN or EIN to prevent rejection.
Payment Misreporting – Reconcile vendor payments before printing.
Alignment Issues – Always do a test print on plain paper first.
Outdated QuickBooks Version – Update QuickBooks to the latest release.
Tips for Smooth 1099 Printing
Double-check vendor eligibility for 1099 reporting.
Keep digital backups of your printed 1099 forms.
Contact QuickBooks support at +1(866)500-0076 if you encounter persistent errors.
FAQs
Q1: Can I print 1099s in QuickBooks Desktop for multiple years?
Yes, QuickBooks allows you to select the desired tax year during the 1099 preparation process.
Q2: What should I do if the 1099 form does not align on pre-printed forms?
Use the Alignment Tool in QuickBooks or perform a test print on plain paper before final printing.
Q3: Can I e-file 1099s from QuickBooks Desktop?
Yes, QuickBooks Desktop allows electronic filing directly through the 1099 Wizard.
Q4: How do I fix missing vendor information?
Update the vendor profile under Vendors > Vendor Center and ensure all tax details are entered.
Q5: Is there a limit on the number of 1099s I can print in QuickBooks?
No, QuickBooks Desktop can handle printing 1099s for all eligible vendors without limits.
Read More:- https://ourpet.com.br/read-blog/21340